Receive and deposit post-dated cheques
Record the cheques a tenant hands you, then send each one to the bank when it falls due.
In this article
Getting started
A post-dated cheque (PDC) carries a future date. Tenants often hand you a set of them when they sign, one for each rent payment. Ultra BMS keeps every cheque in one register, Banking › PDC management, and tracks where each one is.
- Received
You hold the cheque. Its date is still weeks away.
- Due
7 days before its date. Ultra BMS does this for you each morning.
- Deposited
You took it to the bank. Waiting for the money.
- Cleared
The money is in your account. The rent invoice is updated.
If the bank returns it: Bounced Replaced by a new cheque. Settled in cash or by bank transfer instead, it stays Bounced with a Settled note.
Before it reaches the bank it can also be Withdrawn (given back) or Cancelled.
Before you start
- The tenant has an accepted quote in Property › Leasing › Leads & quotes. Its cheque schedule tells Ultra BMS how many cheques to expect.
- Your company bank account is set up in Banking › Bank accounts.
- Your role can manage cheques. Ask your admin if you are not sure.
Steps
You receive the cheques once, when the tenant signs. You deposit and clear each cheque later, as its date comes round.
Scan the cheques when you onboard the tenant
Open the accepted quote, choose Convert to contract and go to step 3, Financial. In Cheque OCR, click Upload 1 on each row and add a photo of that cheque. Check the Cheque no. 2 and the Date on cheque that Ultra BMS reads, and correct them if they are wrong. The date starts from the date in the quote; if the photo shows another date, Ultra BMS offers it for you to accept. A row turns Matches quote 3 when the cheque agrees with the quote. Every cheque in the schedule must be captured before Continue to documents turns on.
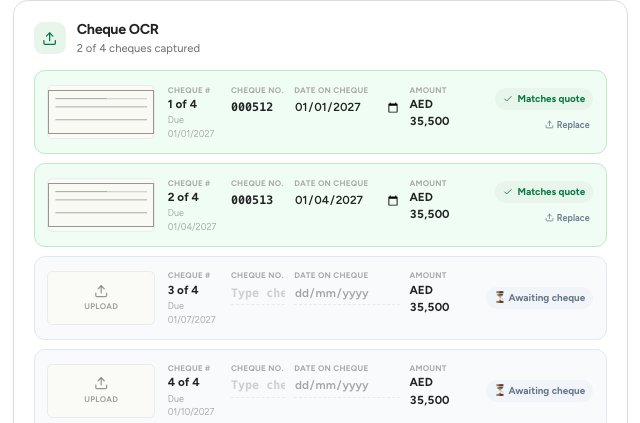
- Upload — add a clear photo of the cheque (PNG or JPG). One cheque per row.
- Cheque no. — read from the photo. If Ultra BMS could not read it, type it in.
- Matches quote — the cheque agrees with the quote. A red label means the amount or date differs.
Finish the last steps and click Submit onboarding. Every cheque now appears in Banking › PDC management with the status Received.
Give the tenant a receipt: open the contract, go to the Payments tab and click PDC receipt. It prints in English and Arabic.
Find the cheques that are due
Go to Banking › PDC management and click the Held tab 1. It lists every cheque you still have. Cheques dated within the next 7 days show Due. Click a Due row 2 to open it.
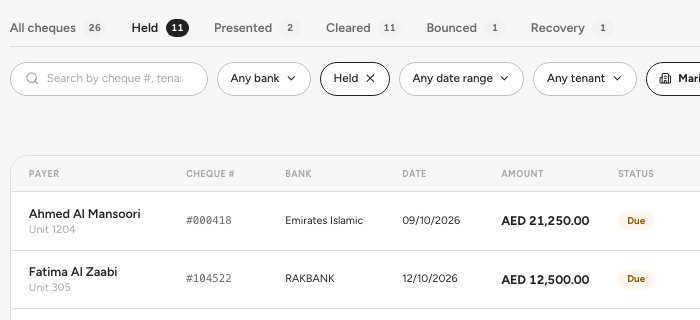
- Held — cheques you have that have not gone to the bank yet.
- A Due row — click anywhere on it to open the cheque.
Tip — Ultra BMS emails your admin users a reminder at 4 PM the day before a cheque’s date and again at 9 AM on the day, so you can plan your bank run.
Open the cheque and click Deposit
The cheque page shows the cheque, its facts and what you can do next. Under Available operations, click Deposit 1.
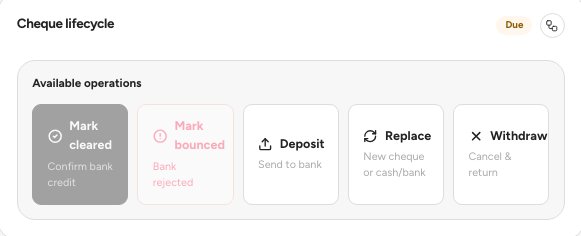
- Deposit — opens Mark as deposited. It works for any cheque you still hold (Received or Due).

Shortcut: while you still hold the cheque, the red Deposit button at the top right of the cheque page does the same.
Enter the deposit details and confirm
Set the Deposit date 1 and pick the Deposit to bank account 2. Click Confirm deposit 3. The cheque moves to the Presented tab with the status Deposited.
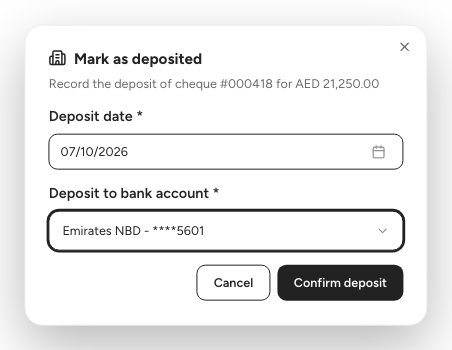
- Deposit date — the day you hand the cheque to the bank. It starts at today and cannot be later than today.
- Deposit to bank account — where the money will land. The list comes from Banking › Bank accounts.
- Confirm deposit — saves the deposit. Both fields are required.
Mark the cheque cleared when the money arrives
When your bank statement shows the money, open the cheque from the Presented tab and click Mark cleared. Set the Clearance date 1 and click Confirm clearance 2. Ultra BMS records the payment on the tenant’s rent invoice for you.
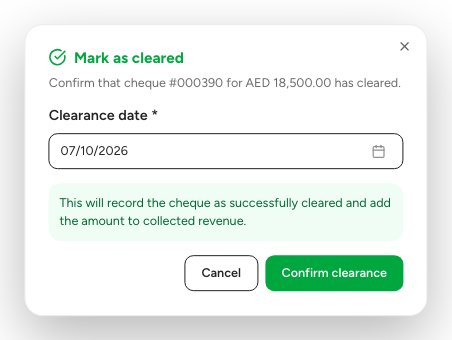
- Clearance date — the day the money reached your account. It cannot be later than today.
- Confirm clearance — the cheque turns Cleared and the rent invoice shows the payment.
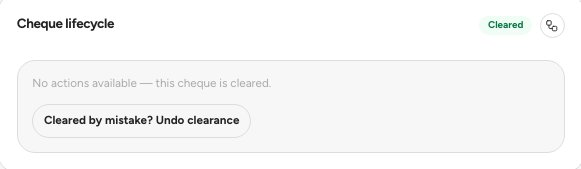
After you confirm, the cheque shows Cleared. If you cleared the wrong cheque, Cleared by mistake? Undo clearance 1 puts it back to Deposited.
Important — If the bank returns a cheque you deposited, open it and click Mark bounced the same day. If the bank returns a cheque after it cleared, do not undo the clearance. Open the cheque and, under Available operations, choose Bank reverses the clearance: it records the return as Bounced, takes the payment off the rent invoice and shows the rent as unpaid again.
Statuses
Every cheque has one status. The tabs on PDC management group them like this:
All cheques shows every status except Withdrawn and Cancelled. Those cheques are closed.
FAQ
Can I deposit a cheque before the date written on it?
Ultra BMS lets you record a deposit for any cheque you still hold, Received or Due. The Deposit date cannot be later than today. As a rule, take a cheque to the bank on or after its date.
What do I do when a cheque bounces?
Open the cheque, click Mark bounced and pick the bank’s reason, such as Insufficient Funds or Signature Mismatch. It then shows under the Bounced tab until you replace it.
The tenant wants to pay a bounced cheque in cash. How do I record that?
Open the bounced cheque and click Replace, then choose Cash or Bank transfer instead of New cheque. The cheque keeps the status Bounced and shows a Settled note with the method and date.
I marked the wrong cheque as cleared. Can I undo it?
Yes. Open the cheque and click Cleared by mistake? Undo clearance. It goes back to Deposited and the payment comes off the rent invoice.
Can I deposit several cheques at once?
No. You deposit each cheque from its own page. The Held tab keeps the cheques that are due together, so you can work down the list on your bank run.
Related guides
Was this helpful?